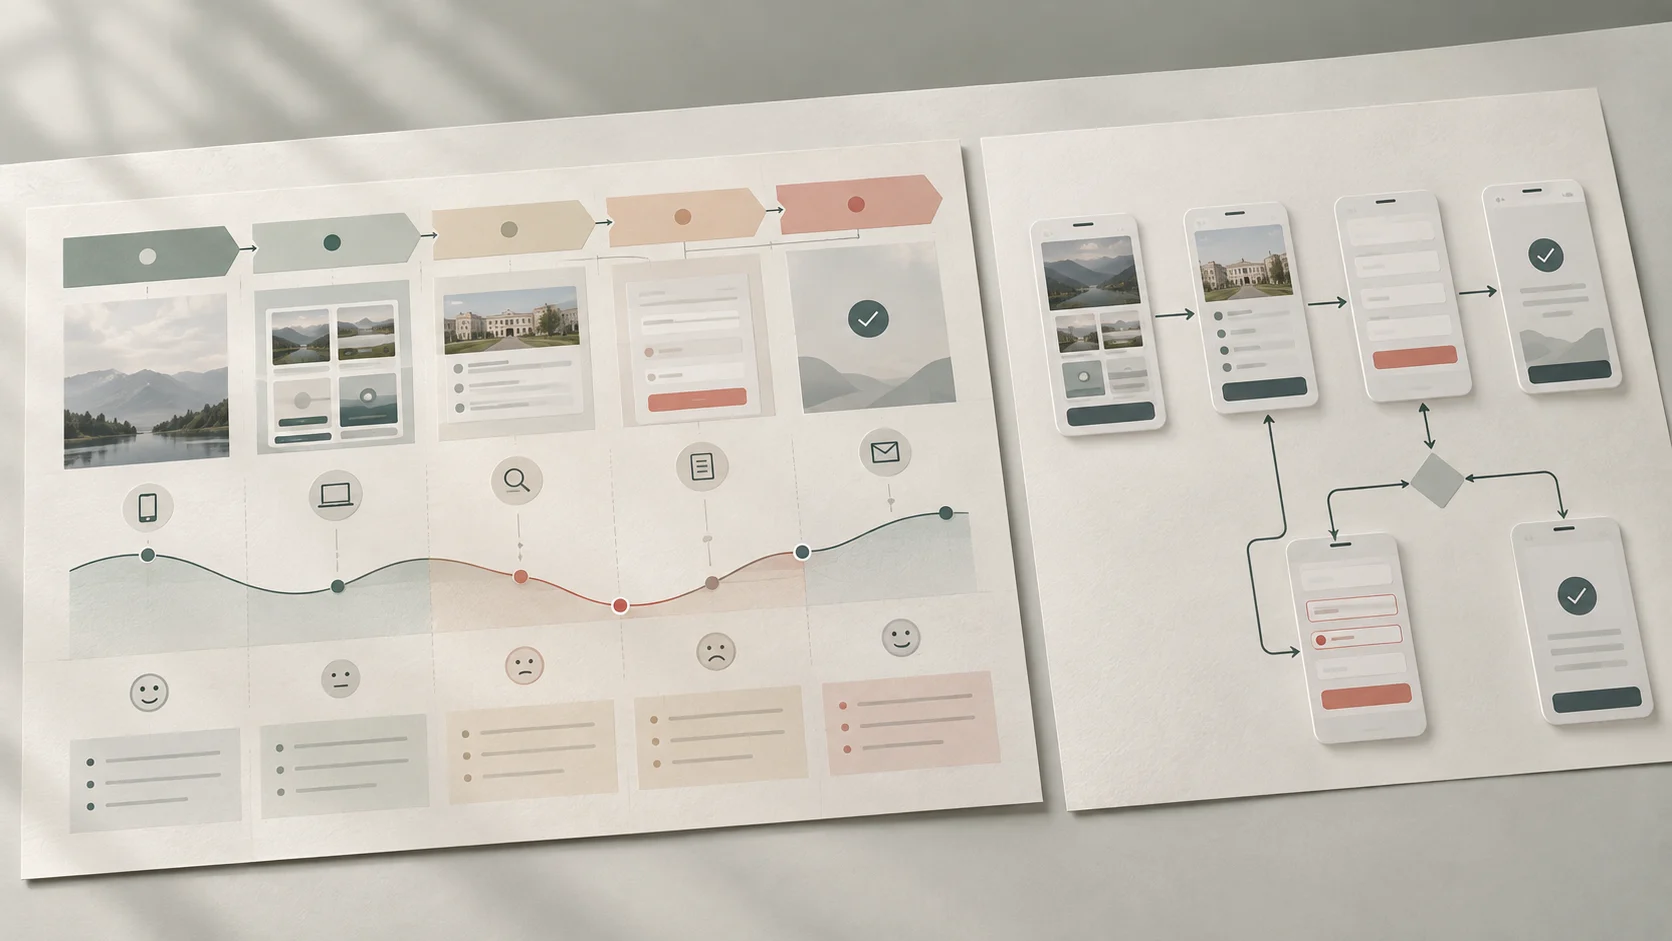
A learner discovers a course through search, compares options, asks a friend, submits an enquiry and waits for a reply. That whole experience is a user journey. The screens and decisions inside the enquiry form are a user flow.
A user journey shows the broader experience of pursuing a goal over time. A user flow shows the specific paths through an interface for completing a task. They can describe the same person and goal, but they answer different design questions.
This guide is for UX beginners, students and career switchers who need to choose the right mapping tool. You will compare the purpose, scope, inputs and outputs of each, then build both around one fictional course-enquiry example. If you need a wider foundation first, read what user experience design means.
User journey vs user flow at a glance
- User journey: a broad, time-based view of how a person experiences a goal across touchpoints.
- User flow: a focused view of interface steps, decisions, alternate paths and outcomes.
- Journey question: Where does the overall experience break down, and why?
- Flow question: What can happen during this task, and how should the interface respond?
- Best combined use: find an important journey problem, design its flow, then test the result in context.
01 What is a user journey?
A user journey is a representation of the experience a person has while trying to achieve a goal. It places events in sequence and helps a team see the experience from the user's point of view rather than through the organisation's departments or individual screens.
A journey may start before someone reaches a product and continue after the main transaction. For a person considering a course, it could include recognising a skills gap, searching, comparing programs, discussing the decision, making an enquiry, receiving follow-up and preparing to enrol. Search results, websites, phone calls and messages are touchpoints within the journey—not the journey by themselves.
Journey maps vary because teams use them for different decisions. Useful layers can include:
- the user and goal being represented;
- stages and the actions within them;
- questions, needs and expectations;
- digital and non-digital touchpoints;
- pain points, moments of confidence and emotional changes;
- research evidence and important uncertainty; and
- opportunities that the team still needs to investigate.
A current-state journey should reflect what relevant users actually experience. The GOV.UK guidance on experience maps recommends capturing several users' experiences before consolidating a map. A future-state journey is different: it describes a proposed experience and should be labelled and tested as a hypothesis.
02 What is a user flow?
A user flow is a diagram of the paths a person can take through an interface to complete a defined task. It connects entry points, screens or states, actions, decisions and outcomes. The detail should be sufficient for the team to reason about how the interaction works.
For the course example, a user flow might begin on a course page and continue through opening the enquiry form, entering details, choosing a contact preference, correcting an invalid field and reaching confirmation. It should also show meaningful alternatives: What if a required field is empty? Can the person go back without losing information? What happens if submission fails?
A useful flow often contains:
- a clear task and start point;
- the main path toward completion;
- decisions that create genuinely different branches;
- system states such as loading, error, empty and success;
- recovery paths and exits; and
- enough screen or content context to make each step understandable.
A flow is not automatically good because it has fewer boxes. A review step, clear warning or recovery route may add a step while preventing confusion or error. Judge the flow against the user's task and the consequences of each action.
03 The key differences
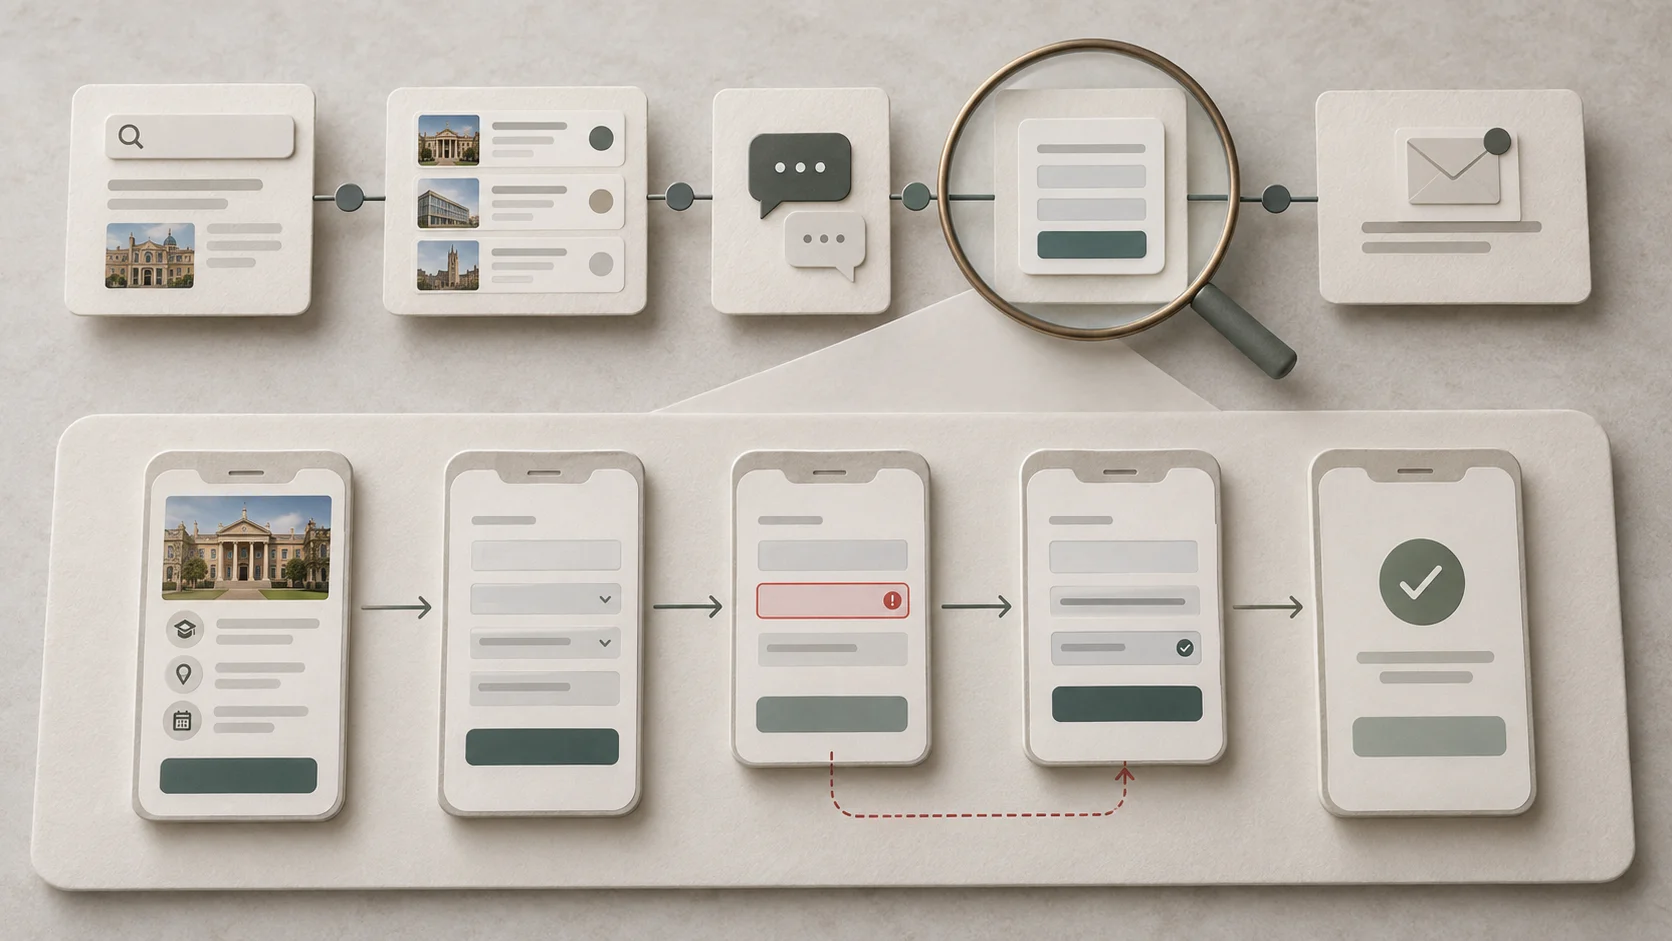
Scope: experience versus interaction
A journey can cross channels, locations, teams and long periods. A flow usually examines one bounded digital task or closely related set of tasks. The journey helps a team zoom out; the flow helps it zoom in.
Focus: context versus logic
A journey emphasises what the person is trying to accomplish, what is happening around them and how the experience changes. A flow emphasises what the interface allows, which choice leads where and how the system responds.
Inputs: research evidence versus requirements and hypotheses
A current-state journey is synthesised from research and operational evidence. A proposed flow also needs user evidence, but it combines that understanding with content, business rules, accessibility needs and technical constraints. Early flows are design proposals, not proof that users will succeed.
Output: shared understanding versus interaction specification
A journey can align collaborators around where a service succeeds or fails and help select a problem to address. A flow makes the proposed interaction discussable before the team commits to detailed screens. Neither artefact replaces a decision; it makes the reasoning visible.
Granularity: stages versus states
A journey stage such as “make an enquiry” might contain one line on the journey map. The flow for that stage may contain many states, branches and error conditions. Putting every interface state into the journey would obscure the wider experience; putting the entire life context into the flow would obscure the task logic.
04 One goal, two maps: a course-enquiry example
Imagine a fictional learner who works full time and wants to understand whether a practical UI/UX program can fit around work. This example demonstrates the method; it is not a report of Zolve Academy learner research or measured behaviour.
The user journey view
The journey begins when the learner recognises a gap between current skills and a desired role. They search, collect a shortlist, compare course timing and practical work, discuss the commitment with someone they trust, submit an enquiry and decide what to do after the response.
The map might reveal that important timing information appears in different places, or that the learner does not know what will happen after sending the form. These are experience-level questions. The right solution may involve clearer website content, a better follow-up message or a change to an internal process—not just a redesigned screen.
The user flow view
Now zoom into “submit an enquiry.” The flow starts from a course page. The learner opens the form, provides contact details and a question, chooses a contact preference, reviews consent information and submits. If a required field is invalid, the interface identifies the problem, preserves completed data and returns focus to a useful place. Successful submission leads to a confirmation that explains the next step.
This map helps the team ask precise questions: Can the form be completed with a keyboard? Are required fields identified clearly? Does the error explain how to fix it? Is the success state distinct from a loading state? What happens when the network fails?
What the pair reveals
The journey explains why expectations and follow-up matter. The flow explains how the form should behave. Improving only the flow would not fix a delayed or unclear response after submission. Improving only the journey would not define the error and recovery states inside the form. The two maps work at different levels of the same experience.
05 When should you use each one?
Use a user journey when the team needs to:
- understand an end-to-end experience rather than one screen;
- connect digital and non-digital touchpoints;
- compare what users need with how a service is currently delivered;
- identify where to focus research or design effort; or
- align different teams around one user goal.
Use a user flow when the team needs to:
- define how a specific task works across screens and states;
- compare alternative interaction paths before detailed UI design;
- find missing branches, dead ends or recovery paths;
- give designers, writers and developers a shared model of behaviour; or
- prepare realistic scenarios for wireframing and prototyping.
Use both when the interaction is one important part of a wider experience. A journey can help select the task worth solving, and a flow can turn that focus into a testable interaction.
06 How to create the maps without confusing them
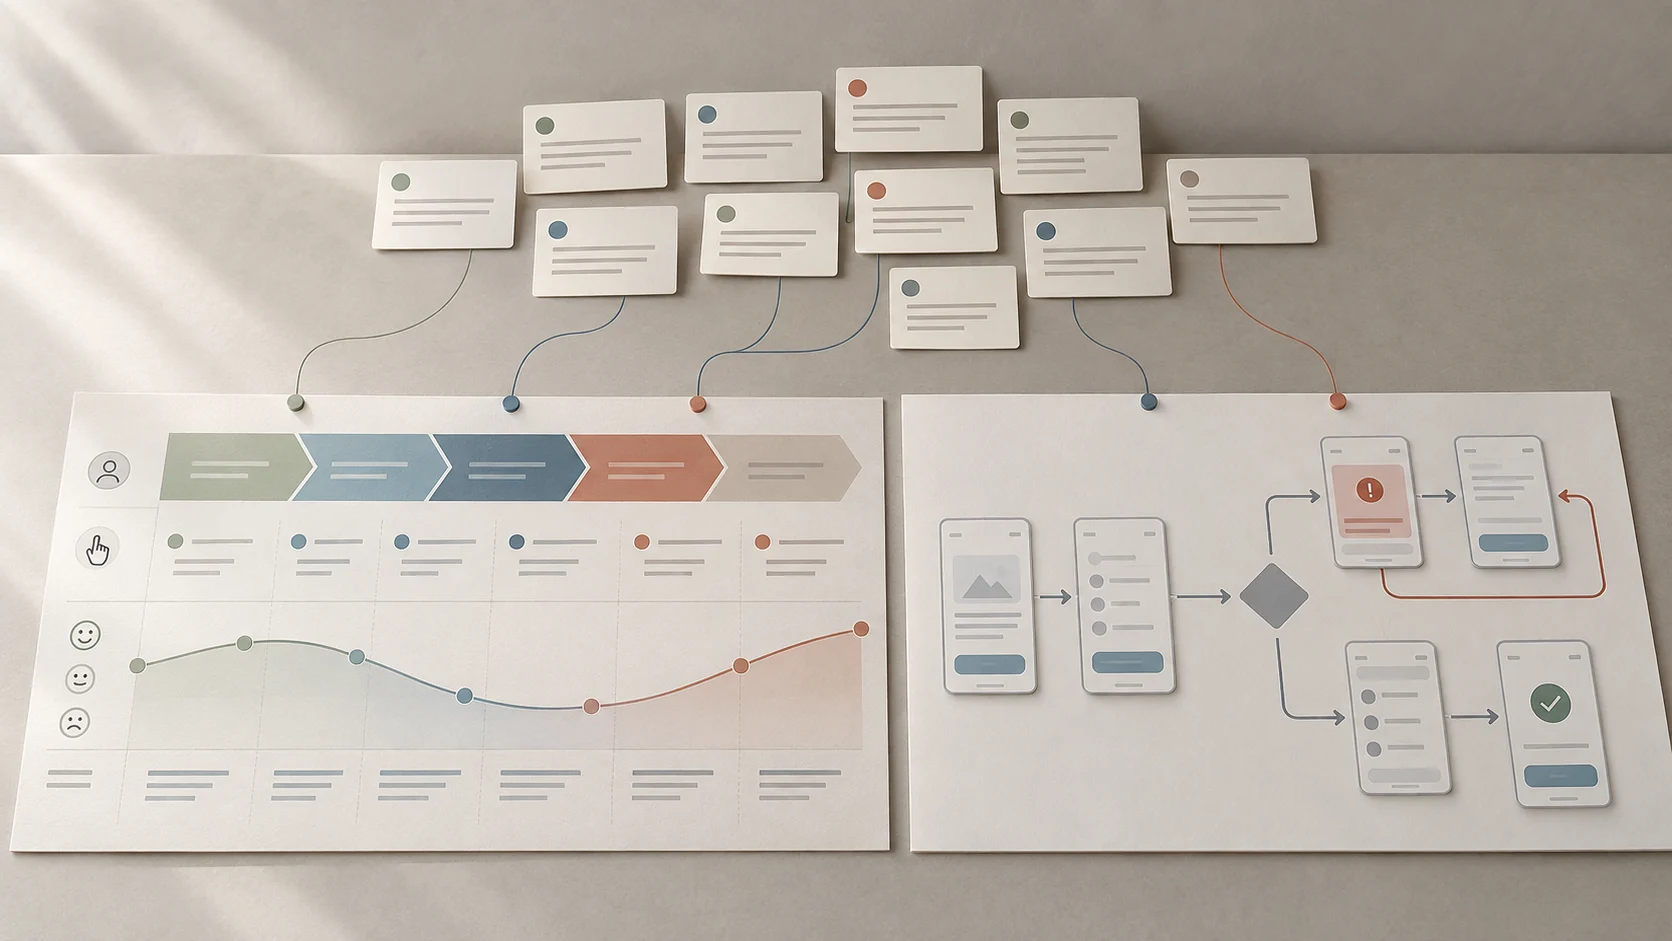
Build a user journey
- Name the user and goal. Define whose experience is in scope and what they are trying to achieve.
- Collect evidence. Use interviews, observation, support themes, analytics or other appropriate methods. Separate observations from assumptions.
- Set boundaries. Choose a meaningful start and end without limiting the map to the organisation's website.
- Group events into stages. Use language that describes the user's progress, such as discover, compare, decide and follow up.
- Add experience layers. Show actions, questions, touchpoints, pain points and evidence. Add emotion only when research supports it.
- Mark gaps and opportunities. Record uncertainty and turn it into research questions instead of filling it with invented detail.
Our guides to UX research methods and process and evidence-based user personas can help you ground the journey in real patterns rather than assumptions.
Build a user flow
- Write the task. Use one observable outcome, such as “Submit a course enquiry and understand what happens next.”
- Choose the entry points. A person might begin on a course page, a saved link or a validation state after returning.
- Map the main path. Show actions and system responses from entry to a clear outcome.
- Add meaningful decisions. Branch only when a choice or condition changes what follows.
- Include non-happy paths. Map invalid input, unavailable data, cancellation, failure and recovery.
- Review with the team. Check content, accessibility, business rules, privacy and technical feasibility before moving into detailed screens.
- Prototype and test. A diagram shows intended logic; observation shows whether people understand and can use it.
07 Common mistakes and how to avoid them
- Making both maps look the same: keep stages and experience layers in the journey; keep interface states and branches in the flow.
- Mapping the organisation instead of the user: “marketing hands off to admissions” describes an internal process. Show what the person is doing and experiencing.
- Inventing an emotional curve: do not add frustration or delight because the template has an emotion row. Use evidence and show uncertainty.
- Drawing only the happy path: include errors, exits and recovery where they affect the task.
- Using a persona name as evidence: a plausible character does not validate a journey. Trace important claims to research.
- Adding every possible branch: map decisions that matter to the current scope. Split an unreadable flow into smaller connected flows.
- Treating the artefact as the outcome: record the question it answered, the decision it changed and what must be tested next.
- Skipping collaborators: writers, developers, researchers and service teams may see rules or handoffs that a designer misses.
08 A practical beginner exercise
Choose a fictional task that contains both a broader experience and a small digital interaction—for example, booking a clinic appointment, joining a workshop or enquiring about a course.
Create both artefacts in one session
- Write the person's goal in one sentence.
- List what happens before, during and after the digital task.
- Group the wider experience into four to six journey stages.
- Label assumptions separately from evidence.
- Choose one important stage and define a specific interface task.
- Draw its start, main path, decisions, errors, recovery and completion.
- Explain one insight from the journey and one issue revealed by the flow.
- Turn each into a question you could test with a relevant person.
When you present the work, do not show polished diagrams alone. Explain the scope, evidence, trade-offs and next test. That reasoning demonstrates UX skill more clearly than the mapping software you used.
09 The simplest way to remember the difference
If the map helps you understand the wider experience around a goal, it is doing the work of a user journey. If it helps you define the possible interface paths through a task, it is doing the work of a user flow.
The labels can vary across organisations, so define what each artefact contains and which decision it supports. A well-named diagram with the wrong scope is still unhelpful. Start with the question, choose the level of detail and make evidence visible.
Want to practise turning research into journeys, user flows, wireframes and tested prototypes? Explore Zolve Academy's Professional UI/UX Design & AI-Powered Workflow Program, review the curriculum and use the course enquiry option to discuss building these skills through practical projects.
FAQ
Common questions about User Journey vs User Flow: What's the Difference?
A quick summary of the most common questions readers have about this topic.
A user journey maps a person's broader experience over time, including stages, goals, touchpoints, context and pain points. A user flow maps the specific steps and decisions a person can take through an interface to complete a defined task.
Start with the artefact that answers your current question. If the team needs to understand the wider experience and choose where to focus, begin with the journey. If the task and scope are already clear and the team needs to design interaction paths, begin with the flow. In many projects, a journey helps define which flow to examine.
Yes. A journey can show key digital screens as touchpoints, but screens are only part of the experience. It may also include conversations, waiting, messages, offline actions and the person's changing questions or emotions.
The terms are sometimes used differently across teams. A task flow commonly shows one straightforward route for one task, while a user flow may include entry points, choices, alternate routes and error recovery. Define the convention in your project instead of relying on the label alone.
A current-state journey should be grounded in evidence from relevant users and service data. A proposed user flow can begin as a design hypothesis, but research, usability testing and technical input are needed to check whether it supports the real task and constraints.